
For the past few months, I have been tinkering with the NIST-approved post-quantum signature algorithm now called SLH-DSA, or “stateless hash-based digital signature algorithm”, formerly called SPHINCS+. SLH-DSA is known for its conservatism: The only cryptographic assumption you need is that your hash function is one-way, which makes it great as a backup in case the novel mathematical assumptions underlying more cutting edge cryptosystems, like ML-DSA, turn out to be wrong.
However, if implemented naively, SLH-DSA is also very slow and its signatures are very large. So I have been experimenting with various performance optimizations, with the goal of minimizing the signature size and cranking up its signing, verification, and key-generation speed.
This article is a collection of the research notes and conclusions I’ve derived from writing, experimenting with, and benchmarking SLH-DSA with different sets of optimizations. Turns out SLH-DSA has pretty high ceiling for performance tuning.

I’ll explain all these optimizations and what they mean, in due time.
For the slightly less patient who want to skip straight to the fastest and furiousest set of optimizations I could find, click here.
SLH-DSA Design
To understand the rest of this article, it will help to have a grasp of SLH-DSA’s internal structure, at least at a high level.
SLH-DSA is composed of several smaller algorithms which it uses as building blocks.
- A hash function. Obviously. In the NIST spec, this is either SHA256, SHA512, or one of the SHA3 family’s SHAKE functions.
- FORS: Forest of Random Subsets. This is a ‘few-time’ hash-based signature algorithm, where a single key can sign a few messages safely, but the more you sign, the more likely someone observing your signatures will be able to maliciously forge a new one.
- WOTS: Winternitz One-Time Signatures. This is a ‘one-time’ hash-based signature algorithm, where a single key can only safely sign a single message. Signing more than one will easily allow forgeries.
- XMSS: eXtended Merkle Signature Scheme. This is a ‘many-time’ hash-based signature algorithm based on WOTS, where a single key can safely sign many messages, but it requires keeping track of a stateful counter. If a key signs two messages with the same counter, forgeries become not just possible, but easy. The counter also can hit a limit, which means the key cannot sign any more messages beyond that limit.
I’m going to gloss over the details of these subschemes, as I already described them in great detail in my earlier survey of hash-based signature schemes. From here onward I will assume readers are already familiar with these subprotocols.
Now we move on to SLH-DSA. An SLH-DSA key begins its life as three byte strings:
sk_seed: Basically, the secret key. If this leaks, you’re screwed.pk_seed: A public salt which gets attached to the public key.sk_prf: A secret salt value used to randomize messages before signing. Think of this as a nonce-generator.
Ignore sk_prf for now. The seed values are the more relevant, because they are used to generate a data structure called a “hypertree” (cool name huh?), which is more or less a tree of XMSS trees. Each tree signs the layer of XMSS trees below it, connecting them all together in a way that a verifier can authenticate.

The above diagram is not “to scale”, in that the real algorithm has many more layers of XMSS trees, and they are often much larger. The exact size of the hypertree depends on the SLH-DSA parameter set. For example, the SLH-DSA-SHA2-128s parameter set (which I focused most of my attention on) uses a hypertree with seven layers of XMSS trees, where each XMSS tree is nine layers tall, making for a total height of
The root hash of the top-level XMSS tree is denoted pk_root. The tuple (pk_seed, pk_root) forms the SLH-DSA public key: Any verifier can use it to verify signatures, but cannot use it to forge new ones (pk_seed grants no signing power, in case you were worried about that).
To sign a message, we use sk_prf to hash the message into a randomizer - another byte string. Then hash the randomizer and message together to pick a pseudorandom path through the hypertree, all the way down to one of the sk_seed and pk_seed to deterministically derive a FORS keypair unique to that exact leaf index, and we sign the message using that FORS keypair.
To link the FORS signature to our hypertree, we sign the FORS keypair’s public key using a WOTS keypair which is also deterministically derived (uniquely for that exact leaf index) from sk_seed and pk_seed. To link the WOTS key, we construct a merkle proof that the WOTS key is part of the bottom-layer XMSS tree. To do that, we must also derive the other WOTS leaf keypairs on that XMSS tree, which are each deterministic and unique. Together, the WOTS signature and the merkle proof form a single XMSS signature signing the FORS pubkey.
OK, at this point we have a single XMSS signature proving that the bottom XMSS tree in our hypertree has approved the message. Now all we need to do is repeat the XMSS-signing procedure recursively, ascending the hypertree one layer at a time, signing the root hash of the previous XMSS tree on the layer below, until finally we sign using the root XMSS tree and we are done.
In pseudocode - eliding many subtleties - the whole algorithm looks roughly like this.
1 | # key generation |
The final SLH-DSA signature is just a concatenation of the subschemes’ signatures, prefixed with the randomizer.
1 | slh_dsa_signature = concat([randomizer, fors_signature, ...xmss_sigs]) |
What's the point of the randomizer?
In an earlier version of the SPHINCS scheme, there was no randomizer. But the authors later realized this enables attacks by an adversary who can manipulate the message being signed.
If given a message and a public key, the attacker can determine in-advance exactly which FORS leaf key a signature on that message would use. If the attacker can skew the messages so that the signer always reuses the same FORS keypair(s), the signer may reveal a few too many FORS preimages, which could lead to a successful forgery.
This attack could occur again today in a naive implementation of SLH-DSA, but only if the authors were to deviate from the FIPS-205 signing specification by setting the randomizer to some static value like pk_seed or all-zeroes.
To verify the signature, the verifier follows the path we laid out for them back up the hypertree:
- use the
randomizerto hash the message into a hypertree path, and find the correct leaf index. - verify the FORS signature against the hashed message (this outputs the FORS pubkey).
- verify the first XMSS signature signs the FORS pubkey (this outputs the XMSS root hash).
- verify each layer’s signature consecutively until reaching the root XMSS tree’s root hash.
- compare this root hash to the SLH-DSA public key.
In pseudocode, SLH-DSA verification looks roughly like this:
1 | pk_seed, pk_root = pubkey |
As you can see, the verifier needs to compare their computed XMSS root tree hash against some publicly known hash which must be part of the public key. We call this hash pk_root, and it is generated by deriving the root XMSS tree from sk_seed and pk_seed (without necessarily signing anything). So keygen and signing have a lot of procedural overlap.
Parameter Sets
NIST has standardized several parameter sets:
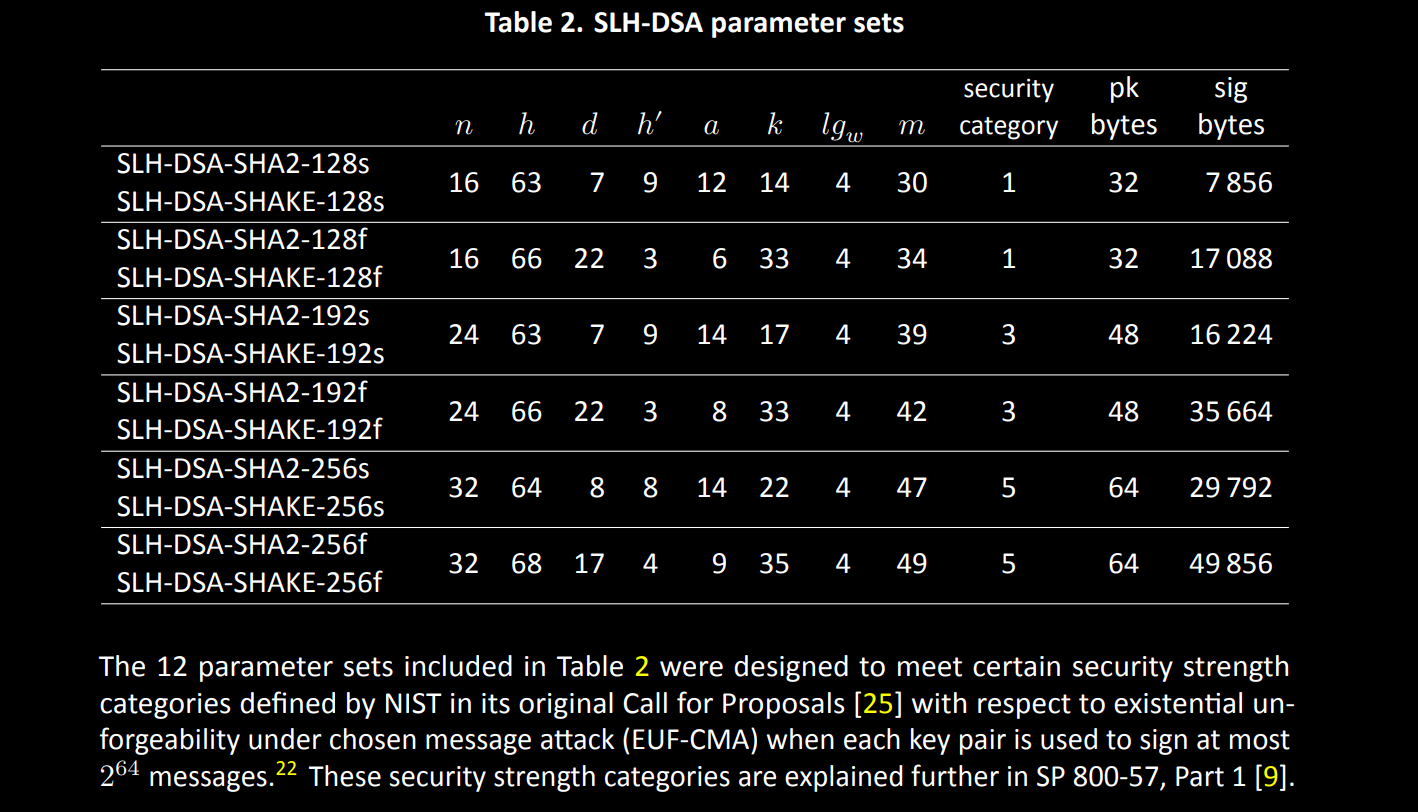
A brief explanation of these arcane symbols:
| Parameter | Meaning |
|---|---|
| The output size in bytes of the hash function used. | |
| The overall hypertree height, counted as the sum of the height of all XMSS trees. | |
| The number of XMSS tree layers which the hypertree is split up into. | |
| The height of each FORS tree. | |
| The number of FORS trees per FORS leaf keypair. | |
| The log (base-2) of the WOTS chain length |
|
| The number of bytes that the message must be hashed into (internal detail, don’t sweat it). |
Experimental Implementation
I started by writing an implementation of SLH-DSA in Rust, available publicly here. It passes all relevant NIST test vectors. I haven’t published this code to crates.io though, as the repo is meant as a platform for experimentation, not a public library. I used this code as a benchmarking reference for optimizations and customizations to the SLH-DSA algorithm discussed in these notes. I chose Rust as its compiler is extremely strict and optimizes code very effectively.
Over time, I added new optimizations gated behind feature flags which enable or disable each optimization, allowing me to benchmark the performance effects of different approaches, while maximizing code reuse. This code is not production grade, but it does serve as a valuable tool for research.
Performance Profile
Any decent performance analysis should always begin with a profiling benchmark to see what you’re up against. I profiled the runtime performance of my vanilla SLH-DSA implementation without any optimizations, using the NIST SLH-DSA-SHA2-128s parameter set. Here are some flame graphs showing the proportion of CPU time spent on each part of the stack for different cryptographic operations.
Key Generation

Signing

Verification

Click on any of the above images to inspect the profiles up close in your browser.
Unsurprisingly, the computational work for all operations is composed almost entirely of executing the underlying hash function. But notice how the vast majority of work for signing and keygen is triggered by the wots_pubkey_gen function, as part of a recursive call to the xmss_node function. This showed me where I should concentrate my efforts, because if we can reduce the runtime of WOTS key generation, we could massively improve the performance of the signing and keygen algorithms, which are by far the most costly.
Initial Benchmark
Without any optimizations, running single-threaded, this is how my SLH-DSA implementation fares benchmarked on my decently powerful desktop PC, running the SLH-DSA-SHA2-128s parameter set. I also compared my code against two other SLH-DSA codebases: The RustCrypto team’s implementation, and the PQCLean Project‘s “clean” implementation (more on that later).
| Operation | My code | RustCrypto | PQClean |
|---|---|---|---|
| Keygen | 62 ms | 65 ms | 58 ms |
| Signing | 470 ms | 494 ms | 438 ms |
| Verification | 0.5 ms | 0.495 ms | 0.434 ms |
- Times are listed in milliseconds.
- RustCrypto
slh-dsawas compiled with its SHA256 code switched to software mode only to give a fair representation of performance. - PQClean was compiled using
-O3 -march=nativeto maximize performance.
At least this shows my implementation is not wildly inefficient right off the bat, but there is a lot of room for improvement especially in signing and keygen. Let’s get cracking.
Optimizations
Note: from now on, I’m going to be focusing only on optimizing the SLH-DSA-SHA2-128s parameter set, namely because that makes it easier to discuss benchmarks without confusing flip-flopping between parameter sets. Also by comparing future benchmarks against the initial benchmark above, it gives us a simple standard yardstick by which to judge the utility of different optimizations. Where applicable, I’ve noted how and if each optimization can be applied to other parameter sets.
Midstate Caching
The SHA256 hashing algorithm chunks the message being hashed into blocks of 64 bytes. Hashing a message simply means calling the SHA256 compression function once for each block, updating a certain internal state on each invocation, represented as eight 32-bit integers. After compressing every block, those 8 integers are serialized and spat out as the SHA256 output.
The authors of the SLH-DSA standard thoughtfully considered this when specifying the hash functions for the SLH-DSA-SHA2-* parameter sets. You see, most of the hash functions calls in an SLH-DSA signing or verifying operation are prefixed with a keypair-specific pk_seed value. See section 11.2 of FIPS-205.
The SLH-DSA authors knew that if written naively, calling SHA256 like this would result in unnecessary extra computations for 192-bit and 256-bit parameter sets, as the
This is why for SHA2 parameter sets, the SLH-DSA spec pads pk_seed to a length of 64-bytes before it is hashed. Since pk_seed is the same for every hash operation within the context of a specific keypair, we can precompute the SHA256 midstate sha256(pk_seed || bytes(0, 64 - n)) and reuse that state for subsequent hash function calls.

Impact
I wrote midstate caching into my SLH-DSA library gated behind a compiler flag so that I could benchmark the code with and without midstate caching. The resulting speedup is remarkable, nearly cutting the signing and keygen time in half:
| Operation | No Caching | Midstate Caching |
|---|---|---|
| Keygen | 62 ms | 33 ms |
| Signing | 470 ms | 249 ms |
| Verification | 0.5 ms | 0.257 ms |
Note: This optimization is exclusive to the SHA2 parameter sets. SHAKE256 has an input block size of 136 bytes (source). The vast majority of work in SLH-DSA consists of calling the hash function instance pk_seed to 136 bytes for the SHA3 parameter sets, we wouldn’t save any meaningful amount of computation because SHAKE256’s block size is rarely exceeded in the first place.
Otherwise though, this optimization is a massive and easy win. With essentially zero-cost and a factor-of-two speed improvement, this optimization is no-brainer. With this fact in mind, all future benchmarks of my SLH-DSA code will be done with midstate caching enabled.
Comparison to RustCrypto and PQClean
The PQClean “clean” implementation of SLH-DSA also uses midstate caching, but mysteriously does not perform nearly as well as mine does. I am having a hard time explaining why this is the case, and would welcome any contact from the PQClean team to better understand this discrepancy: It suggests that PQClean could potentially perform much better than it does currently.
As for the RustCrypto team’s implementation of SLH-DSA, they do not use midstate caching at all, at least not at the time of writing.
XMSS Tree Caching
An SLH-DSA key is conceptualized as a hypertree of XMSS subtrees. Each tree “certifies” the child trees below it with WOTS signatures, and the bottom layer of trees certifies FORS key pairs, which are themselves used to sign an actual application-specific message.
Regardless of which path a signature takes through the hypertree, the top-level XMSS tree is always the same for every signature, and it does not depend on the message being signed.
This means the computational work of deriving the root XMSS tree’s WOTS keys and internal nodes is redone for every signature in the standard SLH-DSA reference algorithms, and it is also redone whenever computing pk_root during the key-generation algorithm. We can avoid redundant recomputation by caching the leaf nodes of the root XMSS tree in memory at keygen time, or by precomputing them after loading the keypair from disk.
For SLH-DSA-SHA2-128s, this cache consumes only 8 kilobytes of memory per keypair, and using the cache when creating signatures reduces signing workload by about 10-15%. While this optimization does work for any parameter set, it works best on parameter sets with lower
Impact
This PR implemented root-tree caching in my SLH-DSA codebase. Benchmarks confirm this reduces the number of hashes needed for signing by a factor of about SLH-DSA-SHA2-128s parameter set, this change reduced the number of hash function invocations from 2.18 million to 1.89 million (about 14%).
| Operation | No Caching | XMSS Root Tree Caching |
|---|---|---|
| Keygen | 33 ms | 33 ms |
| Signing | 249 ms | 216 ms |
| Verification | 0.257 ms | 0.257 ms |
In practice, precomputing the root tree would be a preparatory step that an application can take when we expect to sign a message, but don’t yet know what message we want to sign. Precomputing the root XMSS tree takes the same amount of time as SLH-DSA key generation (they are the same fundamental operation), and it would need to be done anyway if we ever sign a message.
Since the root tree is recomputed for every signature, caching it is an easy win if we have the memory to spare. For future benchmarks, I will include cached-root-tree signing as a separate operation alongside standard (no cache) signing.
Comparison to RustCrypto and PQClean
Neither PQClean nor RustCrypto have implemented XMSS tree caching in their codebases.
Modifications
To more precisely tune the performance of the cache, we could increase or decrease the size of the root XMSS tree, but the resulting signatures would not be compliant with FIPS-205, and it would affect the security level of the resulting scheme.
If memory is very scarce, then instead of caching the root tree’s leaf nodes, one could cache the second layer of XMSS tree nodes, or the third layer, or so on. Caching higher layers instead of leaf nodes will stunt the optimization’s performance boost, at the benefit of less memory consumption.
Going the opposite direction, if memory is plentiful, one could also cache an additional hypertree layer, or parts of it. This is inefficient though, as most of the cached 2nd-layer will not be used unless making many dozens or hundreds of signatures in a row with the same key. We also get diminishing returns by doing this, as each layer consumes exponentially more memory but only offers a linear runtime reduction of
Hardware Acceleration
CPU manufacturers like Intel and AMD have released dedicated hardware instruction sets which massively boost the performance of SHA-2 hashing algorithms, including SHA256.
These instructions are only available on certain modern CPU architectures. Thankfully, by the time most laypeople will be using SLH-DSA on consumer devices, these hardware instructions will be plentifully available. My x86 CPU thankfully supports these instructions which makes benchmark comparisons possible.
Impact
To activate the x86 instructions on my CPU, I outsourced to the sha2 crate from the RustCrypto team, which autodetects and uses SHA2 native hardware instructions if they are available. It had a significant impact on performance:
| Operation | No HW Acceleration | SHA-NI HW Acceleration |
|---|---|---|
| Keygen | 33 ms | 11.6 ms |
| Signing | 249 ms | 88 ms |
| Signing (root tree cached) | 216 ms | 77 ms |
| Verification | 0.257 ms | 0.089 ms |
Here is an additional benchmark from one my colleague’s PC, which has an AMD Ryzen AI 350, with and without hardware acceleration (thanks Hunter!).
| Operation | No HW Acceleration | SHA-NI HW Acceleration |
|---|---|---|
| Keygen | 39 ms | 15 ms |
| Signing | 245 ms | 96 ms |
| Signing (root tree cached) | 284 ms | 111 ms |
| Verification | 0.287 ms | 0.111 ms |
We can see the resulting speedup is about a factor 2.5x across the board.
While highly effective, this optimization depends on a specific set of CPU instructions which are not universally available. Any code implementing SHA2 hardware acceleration is highly platform-specific by nature. And as you’ll see later, for the specific case of SLH-DSA, SHA2 hardware acceleration is actually less effective than other more general and ubiquitous x86 CPU instruction sets like AVX2, and unfortunately you cannot combine them (as far as I can tell).
Comparison to RustCrypto and PQClean
RustCrypto’s SLH-DSA crate inherits SHA2 hardware acceleration from the auto-detecting capabilities of the sha2 crate, which gives them the same ~2.5x performance boost on any machine with SHA2 native instructions.
Here is how RustCrypto’s SLH-DSA implementation performs with and without hardware acceleration:
| Operation | RustCrypto | RustCrypto + SHA-NI |
|---|---|---|
| Keygen | 65 ms | 23.2 ms |
| Signing | 495 ms | 178 ms |
| Verification | 0.495 ms | 0.181 ms |
PQClean has not implemented SHA2 hardware acceleration, but this is because they instead wrote a vectorized implementation of SLH-DSA using x86 AVX2 instructions, which runs faster and works on more machines. More on that soon.
SHA3 Acceleration
Unfortunately, SHA3 hardware acceleration is not widely available yet, so while this optimization is applicable to the SHA3 parameter sets, it is not practical. When and if SHA3 hardware acceleration becomes widely available, most experts expect the relative speedup to be of even greater magnitude than SHA2 hardware acceleration, owing to the fact that SHA3’s underlying permutation function can be more effectively optimized in hardware than SHA2’s compression function.
This means there will likely be a wide performance disparity for SLH-DSA-SHAKE-* between machines which have SHA3 hardware acceleration, and those which don’t, especially if the rollout of SHA3 hardware acceleration is as spotty as that of SHA2.
Assembly
Hardware acceleration should not be confused with assembly language implementations of SHA256. These pieces of sensitive, handwritten machine-language code are typically faster than implementing SHA256 in higher-level languages like C or Rust, but not by a lot.
I was able to get a ~10% speedup in my SLH-DSA code by enabling the asm feature on the sha2 crate, which causes it to fall back on an assembly language SHA256 implementation when dedicated SHA256 CPU instruction sets are not available. While this is not as remarkable a speedup as dedicated hardware acceleration, it is appreciable.
Vectorized Hashing
Most machines these days have specialized instruction sets to optimize parallel computations, called SIMD (single instruction multiple data) instructions. These are dedicated CPU instruction codes available on certain CPU architectures (and WASM environments) which run arithmetic and bitwise operations in parallel on packed sets of input numbers.
For example, on x86 processors with the sse2 instruction set, we can use the _mm_add_epi32 instruction to add together two vectors of four uint32 numbers much faster than you could by doing a naive loop in software. Example:
1 | assert _mm_add_epi32([1, 2, 3, 4], [5, 6, 7, 8]) == [6, 8, 10, 12] |
Or we can use the _mm_xor_si128 instruction, which XORs two 128-bit vectors of packed numbers together. Check out Intel’s documentation for a full list of these instructions.
To compute the SHA256 compression function, we only need a few primitive bitwise and arithmetic operations:
- Wrapped
uint32addition (AKA addition modulo) - Left/right bit-shifting
- Bitwise XOR
- Bitwise AND
- Bitwise OR
All of these primitive operations are available in vectorized form, in the SSE2 and AVX2 extensions of the x86 architecture, and on aarch64 using ARM NEON instructions.
Using Intel SSE2 or ARM NEON (128-bit SIMD), we can effectively compute four hashes at once, in parallel, with only a single CPU core. This is because SHA2 uses 32-bit numbers, and we can fit four of those into each 128-bit SIMD register. If the CPU supports AVX2 (256-bit SIMD), then we can compute eight hashes in parallel.
This is perfect for SLH-DSA. As we saw in the flamegraphs, most of the work in SLH-DSA comes from generating Winternitz (WOTS) public keys. If you recall how WOTS works, pubkey generation just means iterating some number of hash chains repeatedly. Each hash chain inside a WOTS key is independent, meaning we can use these SIMD instructions to compute multiple WOTS hash chains simultaneously. We can also use the same technique to optimize verification, but the process is a bit more involved.

Impact
Here is my implementation using AVX2 to accelerate SLH-DSA’s FORS and WOTS subschemes. I also wrote the same functions with SSE2, and again in pure Rust without vector instructions for a control. I chose to write functions dedicated to specific SLH-DSA subprocesses, rather than writing a generic vectorized SHA256 algorithm, because doing so allowed me to better optimize the internal SHA256 operations (e.g. reusing the first few SHA256 rounds in some cases).
The results are a remarkable improvement, showing the fastest signing and keygen runtimes we’ve yet seen:
| Operation | Default | Soft | SSE2 | AVX2 |
|---|---|---|---|---|
| Keygen | 33 ms | 26 ms | 16 ms | 8.75 ms |
| Signing | 249 ms | 201 ms | 124 ms | 66 ms |
| Signing (root tree cached) | 216 ms | 175 ms | 107 ms | 57 ms |
| Verification | 0.257 ms | 0.242 ms | 0.234 ms | 0.233 ms |
* Note: I did not devote the time to implement vectorization for the verification algorithm, which is why we see so little change to the verification runtime when SIMD instructions are enabled. But PQClean did implement vectorized verification, and we’ll see their performance results soon.
Vectorization is possible for SHA3 parameter sets, but it is much more efficient and much easier to write for SHA2. This is because SHA3 uses a more complex permutation function which acts on 3-d arrays of bits, whereas SHA2 operates on an array of simple 32-bit integers. As I do not have unlimited free time, I chose not to implement SHA3 vectorization. For the curious, check out PQClean’s SHA3 vectorization code.
Blessedly, vector instructions are available on almost every CPU these days. The Steam hardware survey is probably the most useful source of data available online to better understand the availability of these sorts of features, although it is obviously biased in that its data is sourced almost exclusively from gaming PCs.
Though biased, Steam’s data at least shows us that we can expect generic AVX2 instructions to be significantly more commonly available than dedicated SHA2 instructions, and that we can expect SSE2 to be yet more common still.
In fact, SSE2 is so common today, many x86 compilers auto-vectorize certain code patterns using SSE2 by default. At bare minimum it seems safe to assume any x86 CPU will at least have 128-bit wide SIMD available.
I couldn’t find any data about ARM NEON’s availability.
Comparison to RustCrypto and PQClean
RustCrypto’s SLH-DSA crate does not implement vectorization at all.
But PQClean does! They wrote a well-polished AVX2 implementation of SLH-DSA to complement their “clean” reference implementation - the one I benchmarked my code against at the start of all this. Unlike mine, their implementation uses a generic vectorized SHA256 implementation which makes their code much cleaner, but slightly less efficient at signing and keygen than my specialized implementation. On the flip side, this generic approach made it easy for them to implement vectorized SLH-DSA verification, which I did not implement.
Here is how PQClean’s AVX2 code compares against their unvectorized “clean” implementation:
| Operation | PQClean | PQClean AVX2 |
|---|---|---|
| Keygen | 58 ms | 12.3 ms |
| Signing | 438 ms | 94 ms |
| Verification | 0.434 ms | 0.161 ms |
Multithreading
SLH-DSA presents many opportunities for optimization through parallelization. As we’ve seen already, the Winternitz chains used for certification signatures consume the bulk SLH-DSA’s runtime, and fortunately each Winternitz hash chain is completely independent of each other and can be computed in parallel.
This implies the leaf nodes of each XMSS tree in an SLH-DSA key are also independent. They can be computed in parallel across cores during keygen and signing. This further implies that each of the nodes in the merkle path of an XMSS signature can be computed in parallel.
Each XMSS tree in the SLH-DSA hypertree is independent of one-another. While the XMSS certification signatures are indeed dependent on the tree below, the merkle proof part of the XMSS signature (which makes up the bulk of the work of the algorithm via secondary WOTS chains) can be computed in parallel without knowing the root of the child XMSS tree we need to sign.
The FORS signature on the actual message can also be computed in parallel with the merkle paths of XMSS trees.
Impact
I experimented with multithreading to parallelize SLH-DSA at these different levels in the algorithm, and compared the results using a machine with four CPU cores.
First I tried parallelizing at the level of WOTS chains. I spun up four background workers whose sole job was to compute Winternitz chain tips given an input hash. However, it actually resulted in a 10-30% increase in runtime.
Profiling revealed that the inter-thread communication overhead nullified the runtime savings from parallelizing these hash chain computations. This was because each hash chain was only 16 iterations long in the NIST parameter sets, which only takes a few thousand nanoseconds on my machine. Each thread spent almost as much time communicating as it spent computing hashes.
Next, I tried parallelizing the computation of XMSS merkle nodes instead of WOTS hash chains, specifically during signing. This resulted in very succinct code, and also gave better results across all parameter sets, featuring a ~40% runtime reduction compared to single-threaded code.
| Operation | Single Threaded | Multi Threaded | Multi Threaded + AVX2 |
|---|---|---|---|
| Keygen | 32 ms | 32 ms | 8.75 ms |
| Signing | 246 ms | 133 ms | 37.2 ms |
| Signing (root tree cached) | 214 ms | 118 ms | 32.2 ms |
| Verification | 0.254 ms | 0.232 ms | 0.238 ms |
The down side is that this approach is limited to a certain maximum level of concurrency. Given SLH-DSA parameters
Comparison to RustCrypto and PQClean
Neither RustCrypto nor PQClean implemented multithreading inside their code. Though one could use their libraries with multiple threads to produce distinct signatures or verify signatures in parallel, there is no way to use a CPU’s spare available cores to speed up singular operations within these libraries.
Massive Parallelism
In my neurotic quest to maximize speed, I started looking into GPU programming. I have always heard throughout my career that GPUs are the tool to use for highly parallel compute tasks, but I had never taken the time to actually learn how to use them.
This one thought guided me down a months’ long rabbit hole, which has been one of the most frustrating but fruitful learning experiences of my career. Perhaps I will write a separate article at some point, because graphics programming very much deserves its own dedicated space for discussion, outside the context of an SLH-DSA performance analysis.
Before you stop reading and think: “What if I don’t have a fancy gaming GPU?!” You should know: Most CPUs have an on-board graphics card of some kind. If you’re reading this article on any kind of graphical user interface, then your PC or tablet or smartphone or whatever is rendering this page using some kind of graphics card. So yes buddy, this optimization does apply to your device. And even if by some miracle you don’t have a graphics card, some GPU programming frameworks work just as well to accelerate tasks on the CPU. We’ll see the effects of this very soon. Patience.
The graphics programming ecosystem is a tragically fragmented and chaotic mess. There are numerous frameworks available. Some are very old and full of historical crutches (OpenGL was launched in 1992); Others are bound to certain OS platforms (DirectX for windows, Metal for Mac/iOS); Some are so specialized that they only work on specific brands of graphics cards (CUDA for Nvidia cards, oneAPI for Intel).
There do exist generic and cross-platform compute frameworks, such as OpenCL and SYCL, but in my experience, they leave a lot to be desired. I had trouble writing any OpenCL program which reliably worked on non-developer systems without making the user find and install platform-specific drivers for OpenCL. As for SYCL, I couldn’t find beginner-friendly documentation or tutorials on how to write and build SYCL programs (email me if you know any good ones).
Most of these candidate frameworks I wrote off, because of the lack of interoperability. God bless CUDA for how easy it is to learn and use… but dammit Nvidia, I want my code to work on mobile phones, so they can get bent.
Others I pursued briefly but lost interest as I repeatedly failed to find documentation, examples, or tutorials. Maybe my Google-Fu just sucks.
Instead I gravitated towards Vulkan. If you’ve ever been a gamer (or a video game developer), you’ve probably heard of Vulkan. Vulkan is the software that renders the snazzy visuals of many modern video games. It tells the graphics card (or CPU) what to do, so you don’t have to rewrite lots of platform-specific code. Consequently, modern desktop and mobile platforms typically have libvulkan installed by default in the OS, with drivers readily available. Often Vulkan drivers ship within the user’s OS itself.
There’s just one problem.
Vulkan Is Awful
Vulkan prides itself on staying very low level. It is designed as an instrument for expert graphics programmers who know exactly what they want the graphics card to do. Unfortunately this means Vulkan is not beginner friendly at all. The Vulkan “hello world” is infamously long - over 1000 lines of code just to render a triangle. The Vulkan Specification is thirty-three megabytes of HTML (mostly text) - a page so big my browser struggles to load it without freezing up. (PS: if you want a more readable set of Vulkan docs, try this one)
Furthermore, Vulkan is designed primarily for graphics, not compute. While we technically can write non-graphical applications using Vulkan as a parallelization tool, it is not easy. Most Vulkan tutorials assume you’re trying to render graphics. Even if you strip all of the graphics code out, a good deal of boilerplate is still needed to even run the simplest of Vulkan compute programs.
There are compute-specific libraries which use Vulkan as a backend, such as Kompute or Vuda. Vuda doesn’t seem to be maintained, and it doesn’t work on newer versions of Vulkan, so that was a write-off. Kompute was a tempting option, but I chose to learn to use libvulkan directly instead, for a few reasons:
- Vulkan has way better reference documentation.
- Vulkan tutorials are everywhere online.
- More people use Vulkan than Kompute, which means a larger talent pool of devs able to cooperate writing Vulkan programs.
- Vulkan gives the developer more control. Anything I can do with Kompute can be done with
libvulkancalls. The reverse is not always true. - Perhaps most importantly: Vulkan provides a more portable and economically useful skill set for me, as a developer.
This example repository saved my butt, by demonstrating how to write a simple compute shader that draws the Mandelbrot set into a PNG file. If it weren’t for this repo, I probably would’ve given up on learning Vulkan. Kudos, Eric!
By the way, a “shader” is just a program that can run on the GPU. One of the nice parts about Vulkan is that you can run shaders on the CPU too, and the shaders actually use the CPU’s cores and SIMD resources very efficiently! A “compute shader” is a more specific type of shader, which essentially means “a general-purpose program that runs on the GPU”. General-purpose here meaning the program can operate on arbitrary data, whatever the programmer wants.
Vulkan for SLH-DSA
After integrating several other graphics libraries (OpenCL and wgpu), which each had their own problems, I started experimenting with using Vulkan inside my SLH-DSA codebase to parallelize the computation of XMSS tree leaves. To maximize parallelism, I opted to use Vulkan to precompute the leaf nodes of XMSS trees, as these are easily parallelizable independent tasks which would normally consume the bulk of the signing and keygen runtime.
To my astonishment, this resulted in by far the fastest keygen and signing runtimes yet seen: Better than SHA2 hardware acceleration, better than AVX2 vector instructions… even better than multithreading + AVX2, even though I was still using the exact same CPU to run the algorithm.
| Operation | Single Threaded | Multi Threaded + AVX2 | Vulkan (CPU) |
|---|---|---|---|
| Keygen | 32 ms | 8.75 ms | 2.1 ms |
| Signing | 246 ms | 37.2 ms | 11.4 ms |
| Signing (root tree cached) | 214 ms | 32.2 ms | 10.2 ms |
| Verification | 0.254 ms | 0.238 ms | 0.235 ms |
This optimization was by far the most impactful, which was a surprise to me, considering the same CPU was actually doing more work overall. By precomputing the XMSS leaves and discarding the WOTS chains which go into each leaf node, I necessarily have to recompute some of those WOTS chains later to make the WOTS certification signatures. I was computing an extra 2000 or so SHA256 hashes per signature, but it turns out this extra work was insignificant compared to how much time Vulkan saves by maxing out my CPU cores to work through highly-parallel tasks.
Naturally I ran this same code again, but using my GPU instead of my CPU. While I won’t give exact numbers because the comparison isn’t really fair to my CPU, let’s just say the GPU made things even faster.
With this new code, the flamegraph now showed FORS tree computation on the CPU was now taking up about as much of the signing runtime as the XMSS precomputation work. It was time to rethink my approach.
slhvk
Following this discovery, I turned my focus more explicitly towards learning and writing Vulkan. After a brief interlude writing a Vulkan compute middleware library in a vain attempt to make life easier, I came to see an unavoidable axiom of graphics programming: Vulkan is hard, but it’s also awesomely powerful and the best way to exploit that power is to get your hands dirty.
I set about writing an SLH-DSA implementation entirely using Vulkan, with GLSL compute shaders doing (almost) all the signing, keygen, and verification operations. I wrote the library in pure C to avoid the need for Rust FFI bindings on top of libvulkan. I designed the code with a multi-device architecture, allowing me to optionally load-balance the FORS and XMSS signing procedures across two devices, such as an integrated GPU with a CPU, or a discrete GPU plus an integrated GPU, and so forth.
After about a month of work, the code is finally ready and available here. Documentation is still forthcoming, but the Makefile is pretty self-explanatory. For now I have only tested this code on Linux but cross-platform compatibility contributions are very welcome!
The FORS signing operations and XMSS precomputation operations are executed in parallel on two devices, and the final unified SLH-DSA signature is computed once the first stage of shaders is complete.

Keygen is much simpler: Just three compute shaders executed in sequence on the primary device. Each of the latter shaders takes the output of the prior shader as input, finally spitting out the pk_roots of one or more hypertrees.
Verification is implemented in a single monolithic compute shader which performs the entire SLH-DSA verification procedure for a single signature, allowing us to more efficiently parallelize verification of many signatures (more on that in a second).
Bulk operations for verification or keygen could be easily load-balanced across multiple devices, though I haven’t implemented this yet.
Benchmarking
I compared slhvk against my Rust implementation, running simple pure-software single-threaded code, and also against the Rust code with multithreading and AVX2 SIMD enabled.
The results are very encouraging:
| Operation | Single Threaded | Multi Threaded + AVX2 | slhvk (CPU) |
|---|---|---|---|
| Keygen | 32 ms | 8.75 ms | 1.0 ms* |
| Signing | 246 ms | 37.2 ms | 12.2 ms |
| Signing (root tree cached) | 214 ms | 32.2 ms | 10.5 ms |
| Verification | 0.254 ms | 0.238 ms | 0.016 ms* |
See those asterisks * in the keygen and verification benchmark results above? Those are there because, to maximize the effectiveness of Vulkan, I implemented bulk keygen and bulk verification algorithms.
- “Bulk keygen” means generating a bunch of SLH-DSA public keys at once (plus cached root trees if you want them).
- “Bulk verification” means verifying a bunch of SLH-DSA signatures at once and getting back boolean OK/FAIL results for each of them.
This architecture allowed me to increase parallelization, and thus make more effective use of CPU (or GPU) resources, resulting in better per-operation performance. The numbers in the above benchmark are per operation averaged over a large batch size. For example, on any given run, it might take the bulk verification algorithm about 32 milliseconds to verify a batch of 2048 signatures, giving an average time of 15625 nanoseconds per verification.
Throughput vs Latency
In most scenarios like where you care about SLH-DSA keygen or verification performance, you’re probably running the algorithm many times on different inputs, and you want to minimize the overall amount of CPU (or GPU) time spent. This is called “throughput”.
For example, if you’re verifying a Bitcoin block (in a world where Bitcoin supports post-quantum cryptography), you probably have a few hundred or even a few thousand SLH-DSA signatures you need to verify. To verify the block as fast as possible, you want to verify every signature and potentially return early if any of the signatures are invalid.
There are some scenarios - such as TLS handshakes - where you instead would prefer to minimize the amount of time spent on a single sequential operation, e.g. the time to verify a single signature on a TLS certificate, or to generate an ephemeral keypair. This is called “latency”.
Reducing latency and maximizing throughput are related but sometimes opposing goals. In the slhvk library, I aimed to maximize throughput for verification, and to minimize latency for signing. For keygen, I believe I managed to achieve both low-latency and high-throughput without sacrificing either one.
To better illustrate this, here is the a benchmark comparing slhvk running with bulk verification and keygen operations, compared to running it repeatedly in sequence, without any batch parallelism.
| Operation | slhvk (CPU) No Batch |
slhvk (CPU) Batched |
|---|---|---|
| Keygen | 2.1 ms | 1.0 ms |
| Verification | 0.780 ms | 0.016 ms |
As you can see, without batching, the overhead caused by using Vulkan compute shaders actually results in a noticeable slowdown in verification latency, so much so that we would’ve been better off using naive single-threaded code.
While it is possible to make a Vulkan compute pipeline to minimize SLH-DSA verification latency, this was not a goal for me personally, so I did not pursue it. Due to Vulkan’s overhead, it seems likely that CPU-bound AVX2 vectorization or SHA2 hardware acceleration will provide much lower single-input latency than parallelized Vulkan code ever could, and with less implementation complexity to boot. But for verifying many signatures in bulk, compute shaders are where its at. Especially if you have…
GPUs
The original reason why we implemented SLH-DSA with Vulkan compute shaders was to make the best use of available resources on any given host machine, and as I mentioned before, almost any consumer machine has at least one GPU. So now our hard work implementing SLH-DSA in Vulkan really starts paying off.
While direct comparison against the hitherto CPU-bound benchmarks is a bit unfair, I’d be remiss not to at least offer a glimpse of the phenomenal performance we can unlock by using GPU devices.
| Operation | slhvk (CPU) |
slhvk (GPU) |
|---|---|---|
| Keygen | 1.0 ms | 0.16 ms |
| Signing | 12.2 ms | 2.61 ms |
| Signing (root tree cached) | 10.5 ms | 2.48 ms |
| Verification | 0.016 ms | 0.0118 ms |
For privacy reasons, I can’t reveal the exact hardware I was testing on. But I did try renting some GPU cloud servers from Vast.ai, allowing me to benchmark this code on various GPUs. Here are some comparisons:
| Operation | Xeon E5-2673 + GTX 1660 | Xeon E5-2697 + RTX 3060 Ti |
|---|---|---|
| Keygen | 0.27 ms | 0.14 ms |
| Signing | 4.16 ms | 2.67 ms |
| Signing (root tree cached) | 3.89 ms | 2.58 ms |
| Verification | 0.0689 ms | 0.0248 ms |
Keep in mind, these benchmarks were done on a virtualized server, so they may not accurately reflect the real performance of the graphics cards on a bare-metal machine like most consumers would be using. The poor performance of the virtualized CPUs seems to be bottlenecking the benchmark performance, especially for signature verification.
To my surprise, I always got better results from my code when running all shaders on the GPU, rather than by load-balancing XMSS on the GPU and FORS on the CPU. Apparently GPUs are so brutally effective at parallel processing that the CPU just can’t keep up. I’m very curious what kind of performance you could get from load-balancing across multiple GPUs.
By way of comparison, ECDSA keygen/signing/verification all have a latency on the order of 0.01 milliseconds (10000 nanoseconds) on my CPU (single-threaded, benchmarked using libsecp256k1). Our SLH-DSA verification - and to a lesser extent, keygen - runtimes are now starting to approach pre-quantum elliptic curves in performance. SLH-DSA signing remains two orders of magnitude more costly compared to ECC though.
Caveats
Vulkan isn’t perfect. Like many graphics programming frameworks, a Vulkan program will need to compile shaders at runtime on the device they’ll actually be executed on. In Vulkan, this is called “pipeline creation”. Unfortunately compiling shaders is often very slow - On my hardware the initial setup time for all slhvk pipelines varied from a few hundred milliseconds to as much as 10 seconds depending on what combination of CPU and GPU devices I was using. This could be reduced if you only needed a specific subset of the algorithms - e.g. only verifying, only keygen, etc, because then the program need only compile the shaders it will actually use.
Shader compilation only needs to be run once, at program startup, but still this could be a non-starter from some use-cases such as short-lived command line applications. If an app only signs a single message, then it doesn’t matter if it can save a few dozen milliseconds of signing time suing Vulkan, because shader compilation will probably eat up much more time.
This is also an issue in video game development, where shader compilation can sometimes take minutes on first startup. To avoid making players wait this long every time they start a game, devs typically cache the compiled shader binaries, avoiding wasteful recompilation at the expense of disk space and code complexity. I haven’t yet taken the time to investigate this avenue, but I hope to in the future.
Until then, this approach is better suited to long-lived programs which run persistently, and can thus afford to incur a larger startup penalty.
Furthermore, the massively parallel design I went with requires a surplus of memory to store the intermediate outputs of all the parallel shader invocations. For SLH-DSA-SHA2-128s signing, this requires approximately 2-3 megabytes of memory at peak use. For keygen and verification, the amount of memory scales with the batch size. For example, generating 1 SLH-DSA keypair consumes about 300 KiB of memory, while generating 128 keypairs in parallel would require about 40 megabytes. On most consumer machines this is not a problem, but such requirements would be intolerable on resource-constrained devices like embedded systems.
Due to this, I expect parallelized SLH-DSA is best-suited to retail computers, servers, and mobile devices. Embedded system engineers would be better off looking at current research into accelerating SLH-DSA using FPGAs, or with dedicated hardware instructions.
Visualization
We’ve come a long way from the original naive implementation we were benchmarking back at the start of the article. This wouldn’t be a performance analysis without a bar chart, and now seems like as good a time as any.

- In the verification chart, I’ve elided the optimizations which I only implemented for keygen/signing, as they did not impact verification performance.
- These charts are from benchmarks ran on my personal linux machine. Results may vary on different hardware.
- Vulkan verification benchmarks are averaged over a bulk parallel verification of 2048 signatures.
- The verification performance comparison is biased towards the Vulkan code, as a multithreaded verification implementation would likely stack up much better against Vulkan. Sadly, I did not have the time to implement this.
- Vulkan keygen benchmarks are averaged over a bulk parallel keygen of 512 keypairs.
Related Works
I am by no means the first person to consider using GPUs to accelerate SLH-DSA (AKA SPHINCS).
- https://github.com/kindongsy/TCAS-SPHINCSp_GPU/
- https://arxiv.org/pdf/2211.12265v1.pdf
- https://ieeexplore.ieee.org/document/9095410 (paywalled)
- https://ieeexplore.ieee.org/document/10461494 (paywalled)
- https://ieeexplore.ieee.org/document/10677363 (paywalled)
But surprisingly, all the prior research on GPU-driven SLH-DSA that I could find was implemented in CUDA, Nvidia’s proprietary GPU computing framework. CUDA is awesome for researchers because of how easy it is to write, but it doesn’t make for good production applications because of vendor lock-in and poor portability. Developers need a proprietary closed-source compiler toolchain to build CUDA programs, and users need a Nvidia GPU to run CUDA programs. CUDA kernels can’t even run on a CPU at all.
Vulkan on the other hand is an open API specification which any CPU or GPU hardware vendor can (and usually does) support. Vulkan programs can be built with a regular ol’ C/C++ compiler. Vulkan drivers are available for just about any computing device, and popular vendors’ drivers are often installed by default. If one’s intent is to optimize SLH-DSA in the real-world (not just for hypothetical research), then Vulkan seems like the best game in town to me. It was surprising to find no previous attempts to optimize SPHINCS with Vulkan.
Further Research
There remain some unanswered questions I hope to investigate in the future:
- What are the security ramifications of storing sensitive secret key data in Vulkan device buffers? Can Vulkan’s device-local memory be protected against side-channel or memory-dumping attacks?
- Can my shaders be better optimized to improve signing or verification performance even further?
- Does the source code language of a shader make a meaningful performance impact in the resultant shader code? My current set of shaders are all written in GLSL, but there are other shading languages like HLSL, or Slang, which may (or may not) compile into more efficient machine code.
- To what extent can SLH-DSA verification latency be improved by breaking the algorithm up into smaller shaders?
- How does
slhvkbulk verification compare against simple multi-threaded verification, especially when combined with hardware instructions like AVX2 or SHA-NI? - How do we optimize the Vulkan shader compilation process to reduce program startup time? (e.g. caching, scoped contexts)
- What are the performance effects of load-balancing signing across multiple GPUs? (e.g. an integrated GPU plus a discrete GPU)
- What are the performance effects of load-balancing bulk keygen/verification across multiple devices?
- How effective is Vulkan at parallelizing the SHA3 parameter sets? How does it compare to SHA3 hardware acceleration?
- How do ML-DSA and other post-quantum signature schemes fare when parallelized in a similar way? Does massive parallelization with Vulkan make SLH-DSA more competitive in the post-quantum landscape, or is it a rising tide that raises all ships?
Next Time
Every optimization I’ve shown in this article has been totally compliant with the NIST FIPS-205 specification… But my next writeup on this subject will dive into optimizations which would break FIPS-205 compatibility.
Can significant performance gains be realized if we are willing to deviate from the FIPS specification? Can we make SLH-DSA signatures smaller? How small, exactly?
More to come…